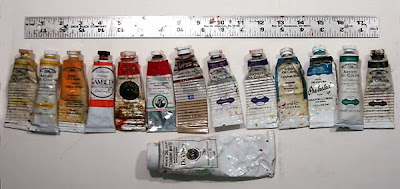
Many of you probably already know this, but my wife is also a painter. She recently started a blog, and she is doing a series of posts on how to stretch a canvas. If you are at all interested in such a thing go check it out.
Showing posts with label materials. Show all posts
Monday, November 29, 2010
Wednesday, September 22, 2010
Materials: Gouache Sketching

In this I have a very limited palette of Winsor & Newton gouache colors, permanent white, lemon yellow, golden yellow, flame red, ultramarine blue, ivory black. For brushes I have a limited assortment of synthetic sable rounds and one .25 inch flat. For the sketchbook I have a random 5 x 7 spiral bound with heavy, lightly toned paper. I don't remember where I got this thing, so I will be very sad when it is full because it is great for water based media. I also have a spray bottle, because it is compact and multi-purpose. To lay-in my drawing I use a mechanical pencil with a hb lead
Just for fun here is a landscape gouache I did from reference, probably 10 years ago.
As I mentioned I am heading out of town for the next five days or so. I am honored to have two guest bloggers, and they are Dan Dos Santos. Dan will be filling in on Friday, if you don't know Dan's work, shame on you and click on his name. On Monday will be Jeremy Cranford Sr. Art Manager at Blizzard. Thanks Dan and Jeremy.
Friday, September 10, 2010
Palette Layout
I like to lay-out my palette from right to left, warm to cool. While the colors may change slightly from painting to painting the lay-out always remains the same, so that I do not have to dedicate part of my thought process to finding colors. Starting on the right (all colors are Winsor & Newton unless otherwise noted) titanium white, cadmium lemon, cad yellow, yellow ochre, cad orange, cad red, permanent magenta, transparent red ochre (Le Franc), raw umber, winsor violet, french ultramarine, cerulean blue, space blue (Le Franc), cobalt turquoise (Grumbacher), sap green (often replaced by viridian if I need a more chromatic green), ivory black. I sometimes lay out a separate worm of titanium white off to the side for pure highlights.
I have the postcards there to help me key my colors (this is a total lie, I am just a geek who really likes Mike Mignola's work)
Monday, September 6, 2010
New Easel
Hey all,
I recently got a new easel. It is basically a drafting table/easel. The top can tilt up and down at pretty much any angle you want, it has arms (these are easily removable) to hold smaller paintings in place on the drawing surface as well as a bridge that goes over the painting to rest your hand on. Also for larger paintings it has extending easel style arms for holding a painting up to 60 inches tall. I tried it out yesterday and it is perfect.
Wednesday, November 11, 2009
Materials: inking
Surface- Strathmore 300 series 2-ply smooth bristol board

Ink- Higgins T-100 Drafting Film Ink
Applicators-Continuing from left to right
Kaimei natural hair brush pen
Cirrus 220 designers' Kolinsky Sable brush from Winsor & Newton
#102 Crow Quill Nib and holder

Unfortunately both the Cirrus 220 brushes and the Higgins T-100 ink have been discontinued.
I really like the Higgins T-100 (especially if you let it evaporate a little), and have not been able to find a replacement I like. As far as the brush Kolinsky Sable series 7 brushes are great, but the reason I did not use this to start with is they are really expensive. So if anyone can recommend an affordable alternative to either of these let me know.
Wednesday, August 26, 2009
Materials: studio painting 2.5
Donato Giancola
Monday, August 17, 2009
Materials:studio painting part 2
Here is the process I follow to prepare a surface for a finished studio illustration.
Image 1:
The materials I use are Liquitex Basics Acrylique Gesso, a craft foam brush (I usually get these in a multipack at Michaels), double-sided hardboard (I get a 4ft x 8ft sheet and have them cut it into 4ft x 2ft strips, then cut it to whatever size I need on my tablesaw at home), Black & Decker Mouse electric sander, and an old hair dryer (optional)

Step 1:
Lightly sand the surface to remove any oils and imperfections on the surface.

Step 2: Mix your gesso with a little bit of water in a separate container to give it a creamier consistancy that is more conducive to smooth application
Step 3: Thoroughly clean the surface of any debris with a damp cloth

Step 4: Using your foam brush apply the diluted gesso evenly with smooth parallel strokes

Step 5: Apply perpendicular strokes to those you initially used to gain a smoother grain (you may need to use more gesso at this stage if you applied it very thinly on step 4) Do not press too hard with your brush strokes, lightly brush across the surface to gain a smooth surface.

Step 6:(optional)
I used to use a hair dryer to speed the process, now I use the drying time as a chance to take a break and get something else done.

Step 7: repeat steps 4-6
Step 8: Lightly sand the surface to your desired smoothness, and then clean surface of gesso shavings

Step 9: repeats steps 3-8 till you achieve your desired coverage and texture. I generally do this 2 more times so that I have a very smooth, bright white surface. Occasionaly I will skip the final sanding if I am going for a brushier look to a painting.
Monday, August 10, 2009
Materials: studio painting
My pallet: all Winsor Newton brand unless otherwise stated
cadmium lemon, cad yellow, cad yellow orange, cad orange(Gamblin), cad red light(Da Vinci), magenta(Old Holland), transparent red ochre(Le Franc), winsor violet, french ultramarine, cerulean blue, cobalt turquoise(Grumbacher), viridian, ivory black, titanium white(Da Vinci)
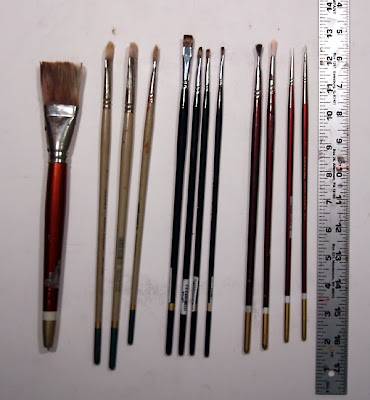
My brushes:
I use a large 2 inch Robert Simmons synthetic sable flat, Robert Simmons Signet bristle filberts ranging in size from 2 to 10, and Langnickel mongoose sable brights from 2 to 10, Robert Simmons synthetic sable rounds 1 to 3.

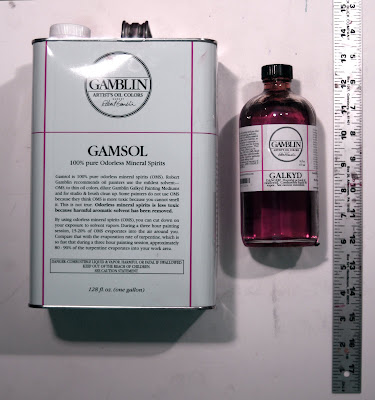
My mediums/thinners:
To add viscosity and speed the drying time of my paints I typically use Galkyd. To cleanse my brushes while painting and to cut the Glakyd I use Gamsol.
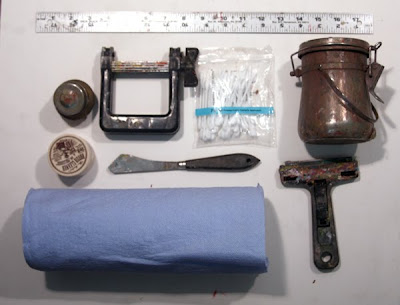
Misc:
Moving clockwise from the upper left, a small container for my Galkyd, a paint ringer for salvaging, the remnants in my paint tubes, cotton swabs for working with thin paint, a medium size container for my Gamsol, paint scraper for cleaning my pallet, shop towels, old masters brush cleaner for cleaning my brushes at the end of the day, and in the middle a pallet knife.

Most of these materials can be purchased at one of the two art store linked in the upper right corner of this blog, they are the two I most often use.
I will do a separate post on how I prepare my painting surface, but in the mean time I use gessoed hardboard.
Tuesday, July 7, 2009
Materials: quick studies
1. 18 x 24 inch pad of smooth newsprint. It looks like the easiest brand to get online is Richeson, which is fine, but I prefer Borden and Riley or Pro-Art
2. A Conte 1710 B or 2B pencil sharpened to a long taper using a razor blade and sanding pad
3. A kneaded eraser. Design brand seems to be the best, and most easily found.
I clip the pad to a board, support it on my knees/thighs and lean it against a vertical support (drawing horse). Keeping the board as vertical as possible and directly between myself and the model.
I use the side of the pencil for the broad shadows and the point for detail work. I will also use the "blade" of the pencil for line work. To clarify for broad strokes I use it like I am spreading butter on toast, for line work more like I am cutting a steak, and for details more like pushing a sowing needle through cloth. For all three I hold it underhand, more like a sword than a tradition pencil

note: materials not to scale
Subscribe to:
Comments (Atom)


