Monday, August 31, 2009
Friday, August 28, 2009
Perspiration: facial features and expressions
. For expressions I would go to The Artist's Complete Guide to Facial Expression


Also here are some tutorials by my good friend Stan Prokopenko
Ears
Lips
Nose
Eyes
Thursday, August 27, 2009
Inspiration: Fred Fixler

photo courtesy of Dave Darrow

Fred Fixler founded California Art Institute (CAI) in the early 1980's just north of LA in Calabasas. Prior to that he taught at nearby Brandes Art Institute. He studied with Frank Reilly from 1947-49 at the Art Students League, during this time he was roommates with James Bama. It seems that the bulk of his illustration career was spent doing sports illustrations, and movie poster work. It has also been rumored that he did uncredited "sleaze paperback" illustrations for Brandon House in the sixties. Fixler instructed a generation of Southern California artists, including Morgan Weistling, Greg Pro, Mark Westermoe, Shawn Zents, Glen Orbik and Laurel Blechman.
I will leave you with an anecdote from Morgan Weistling
"The secret to capturing the essence of what you are looking at can be found in your high school yearbook.

Fred Fixler would have us look at our high school yearbooks and find that page that has everyone in our grade standing together in one big group shot.
"Can you find yourself?" he would ask. Yes, we could.
"Can you find your friends?" Yeah.
What's the point? Well, in those photos  your head is almost the size of a pea - if not smaller! And yet, without seeing eyelashes, nostrils, pupils in the eyes, or any other details, you recognize people you haven't seen in years! Yet, most of us sit in front of a model drawing the most unimportant details and miss the simple overall shapes that form the essence of who we are observing.
Details are not the answer.
Thanks, Fred."
Here are a couple links to some interesting reading courtesy of Norm Nason
Fred Fixler: notes on drawing
Fred Fixler: notes on gouache
photos of life drawings courtesy Glenn Orbik & Laurel Blechman


Wednesday, August 26, 2009
Collectors: Gregg and Yvette Spatz
So hop on over to Sour Harvest and check it out

Materials: studio painting 2.5
Donato Giancola

Tuesday, August 25, 2009
Painting From Life

Monday, August 24, 2009
Drawings and Demos (Aug 09)
Sunday, August 23, 2009
For My Bro

Wednesday, August 19, 2009
Venture Bros Season 4 Trailer
Tuesday, August 18, 2009
Monday, August 17, 2009
Materials:studio painting part 2
Here is the process I follow to prepare a surface for a finished studio illustration.
Image 1:
The materials I use are Liquitex Basics Acrylique Gesso, a craft foam brush (I usually get these in a multipack at Michaels), double-sided hardboard (I get a 4ft x 8ft sheet and have them cut it into 4ft x 2ft strips, then cut it to whatever size I need on my tablesaw at home), Black & Decker Mouse electric sander, and an old hair dryer (optional)

Step 1:
Lightly sand the surface to remove any oils and imperfections on the surface.

Step 2: Mix your gesso with a little bit of water in a separate container to give it a creamier consistancy that is more conducive to smooth application

Step 3: Thoroughly clean the surface of any debris with a damp cloth

Step 4: Using your foam brush apply the diluted gesso evenly with smooth parallel strokes

Step 5: Apply perpendicular strokes to those you initially used to gain a smoother grain (you may need to use more gesso at this stage if you applied it very thinly on step 4) Do not press too hard with your brush strokes, lightly brush across the surface to gain a smooth surface.

Step 6:(optional)
I used to use a hair dryer to speed the process, now I use the drying time as a chance to take a break and get something else done.

Step 7: repeat steps 4-6
Step 8: Lightly sand the surface to your desired smoothness, and then clean surface of gesso shavings

Step 9: repeats steps 3-8 till you achieve your desired coverage and texture. I generally do this 2 more times so that I have a very smooth, bright white surface. Occasionaly I will skip the final sanding if I am going for a brushier look to a painting.
Friday, August 14, 2009
Truckin'
Monday, August 10, 2009
Materials: studio painting
My pallet: all Winsor Newton brand unless otherwise stated
cadmium lemon, cad yellow, cad yellow orange, cad orange(Gamblin), cad red light(Da Vinci), magenta(Old Holland), transparent red ochre(Le Franc), winsor violet, french ultramarine, cerulean blue, cobalt turquoise(Grumbacher), viridian, ivory black, titanium white(Da Vinci)

My brushes:
I use a large 2 inch Robert Simmons synthetic sable flat, Robert Simmons Signet bristle filberts ranging in size from 2 to 10, and Langnickel mongoose sable brights from 2 to 10, Robert Simmons synthetic sable rounds 1 to 3.

My mediums/thinners:
To add viscosity and speed the drying time of my paints I typically use Galkyd. To cleanse my brushes while painting and to cut the Glakyd I use Gamsol.

Misc:
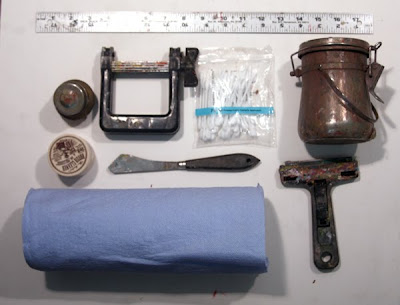
Moving clockwise from the upper left, a small container for my Galkyd, a paint ringer for salvaging, the remnants in my paint tubes, cotton swabs for working with thin paint, a medium size container for my Gamsol, paint scraper for cleaning my pallet, shop towels, old masters brush cleaner for cleaning my brushes at the end of the day, and in the middle a pallet knife.

Most of these materials can be purchased at one of the two art store linked in the upper right corner of this blog, they are the two I most often use.
I will do a separate post on how I prepare my painting surface, but in the mean time I use gessoed hardboard.
Thursday, August 6, 2009
Steamy
Antique Gas & Steam Engine Museum

note:
This is in response to a question asked in the comments
Hey Matt, good question, what you see there is not exactly a grid, because that would not be very helpful for outdoor sketching(while this was done from a photo I was using the same approach I use for sketching "from life") I do not use vanishing points very often in freehand sketches, instead what you are seeing here is what I call squared measurement. Essentially I find an area that is perfectly square (seen in red in the new image on my blog) and then I use this to judge any further measurements and or perspective angles angles and slopes. In blue you see the horizon line which helps me judge point of view and perspective (above the horizon looking up, below looking down) One last note, with something this mechanical I will typically look for a major and minor axis to help me in establishing a crude perspective grid, seen here in green.

Wednesday, August 5, 2009
Monday, August 3, 2009
Figure Painting Demo
 Here is a figure painting demo done in a manner similar to the Reilly Painting Method. In this method of painting you start off with a burnt umber pick-out(a form of grisaille or under painting using only burnt umber and the white of the canvas to establish the drawing. Thinning the umber with "turp" or removing the paint from the surface with a rag or other implement to get lighter values). Next I use a controlled pallet consisting of five premixed values of red, yellow, grey and "fleshtone"(blue optional), I begin applying opaque "fleshtone" of matching values a top my underpainting. All along adjusting the "fleshtone" with same value reds, yellows and greys (endevoring to not mix between values) to obtain the natural fluxuations in the color of flesh without changing the value, except where I want to. This is a great way of breaking into painting for artists of great experience in tonal media, but little or no experience with colo
 r.
r.edit:
Here are some notes on my approach to the pallet.
"What I have done here is mix up five values of each primary (red, yellow, blue) flesh tone and grey. For yellow I started with pure cadmium yellow in the second square and added titanium white to lighten and burnt umber to darken. For red I started with Scarlet Vermillion(or Cad Red Light) in the third square and added white to lighten and Alizarin Crimson and Ivory Black to darken. For grey I used just Titanium White and Ivory Black (in the absence of blue this functions in its place). For blue I start with French Ultramarine in the fourth spot and add white to lighten and black to darken. For the flesh tone I start with a base of Burnt Umber and add white to lighten it. This will tend to look ashen so I add red and yellow from the corresponding values to warm it up, tending more towards the yellows in the light values and reds in the dark values"
There is also a book on Reilly's painting method "The Student Guide To Painting" by Jack Faragasso
Here is a link to more info on Frank Reilly
Saturday, August 1, 2009
Sketch Night (August)

What: Movie and sketchnight
When: Sunday Aug 2 5:30 PM
Where: Watts Atelier
Film: Zombie (released as Zombi 2 in Europe)(Starts at 6)
Leave your good taste at home, but bring your sketchbook
Subscribe to:
Posts (Atom)


